Saturday, 12 September 2009

Winner!

And the winner is........Comment #2: JoL !!!!!

Congratulations JoL. I hope your future other-half enjoys the benefits of this. I'll contact you by email for your address and post the book out to you at the start of the week.

To the rest of you - keep an eye out. I had fun with this and hope to do it again soon.
Blog Signature

Monday, 7 September 2009

Giveaway!!!!


This is to encourage all you lurkers and skulkers out there to make a comment - you know who you are!!!

Just for fun I'm giving away a brand new copy of James Martin's 'James Every Day'. I really like this book and was so tempted to keep it but I really don't need another cookbook. I have made a mental note of some of the recipes however. There's some real nice stuff in there. How about 'Roast Celeriac with Vanilla and Garlic' or 'Caramelised Beetroot' or 'Chorizo, Butter Bean and Truffle Oil Soup' ?It's a whole collection of meat, chicken, fish, salads and desserts.
I'm leaving it open until Saturday afternoon to give those who check in here weekly a chance to enter. All you have to do is leave a comment on my blog telling me what's your favourtie recipe I've posted so far (you don't have to have made it).

All entries before 5pm (GMT) on Saturday evening. The winner will be randomly selected (using a random number generator) and I'll announce the winner on the blog on Saturday night.


Blog Signature

Tuesday, 1 September 2009

Banana Tea Bread

Banana Bread 39b

I had my eye on the banana bread recipe in 'How To Be a Domestic Goddess' for a while before I got round to baking it. The original recipe required rum or bourbon, which I don't keep, so I went on the Nigella forum asking for suggestions for a replacement. One forumer in the Middle East replied that until she got her alcohol licence she just soaked the sultanas in tea. "Of course!" I thought. I have a tea loaf recipe that I've made time and time again which requires you do the same and the tea gives it a lovely flavour. Using tea instead of rum/bourbon makes this a very affordable recipe and I confess to actively checking out the reduced section of the supermarket for reduced overipe bananas purely to make this.

And the all-important factor is that my two men love this. I like it toasted with butter as breakfast, JT gets it just plain at any time of the day and Daddy likes a slice buttered in his lunchbox. It would make a great dessert too, slightly re-heated with a scoop of ice-cream.

Banana Bread (3)b

BANANA TEA BREAD

Ingredients:

100g sultanas
A cup of strong hot black tea
175g Plain Flour
2 teaspoons baking powder
1/2 teaspoon bicarbonate of soda
1/2 teaspoon salt
125g unsalted butter, melted
150g sugar*
2 large eggs
4 small, very ripe bananas (about 300g weighed without skin), mashed
60g chopped walnuts
1 teaspoon vanilla extract
23 x 13 x 7cm loaf tin, buttered and floured or with a paper insert

Serving Size : Makes 8–10 slices

Method:

1. Put the sultanas into a smallish bowl and pour over the hot tea. All the sultanas should be covered. If there's not enough tea just add some more boiling water. Set aside while you go ahead with the rest.

2. Preheat the oven to 170ºC/gas mark 3.

3. Put the flour, baking powder, bicarb and salt in a medium-sized bowl and, using your hands or a wooden spoon, combine well.

4. In a large bowl, mix the melted butter and sugar and beat until blended. Beat in the eggs one at a time, then the mashed bananas. Then, with your wooden spoon, stir in the walnuts and vanilla extract. Drain the sultanas and stir them in too. Add the flour mixture, a third at a time, stirring well after each bit.

5. Scrape into the loaf tin and bake in the middle of the oven for 1–11/4 hours. When it’s ready, an inserted toothpick or fine skewer should come out cleanish. Leave in the tin on a rack to cool, and eat thickly or thinly sliced, as you prefer.


*I have made this with caster, granulated and brown sugar and there is little difference. I found that using granulated provided a slightly cumblier texture.


Banana Bread (16)


Blog Signature

Thursday, 27 August 2009

August Daring Bakers: Dobos Torte

Dobos Torte

The August 2009 Daring Bakers' challenge was hosted by Angela of A Spoonfulof Sugar and Lorraine of Not Quite Nigella. They chose the spectacular DobosTorte based on a recipe from Rick Rodgers' cookbook Kaffeehaus: ExquisiteDesserts from the Classic Caffés of Vienna, Budapest, and Prague.

The Dobos Torta is a five-layer sponge cake, filled with a rich chocolate buttercream and topped with thin wedges of caramel. (You may come across recipes which have anywhere between six and 12 layers of cake; there are numerous family variations!) It was invented in 1885 by József C. Dobos, a Hungarian baker, and it rapidly became famous throughout Europe for both its extraordinary taste and its keeping properties. The recipe was a secret until Dobos retired in 1906 and gave the recipe to the Budapest Confectioners' and Gingerbread Makers' Chamber of Industry, providing that every member of the chamber can use it freely.

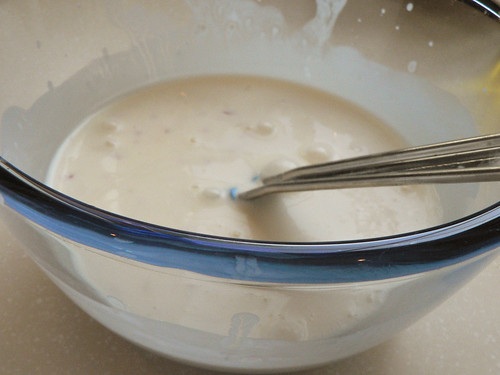
When my sister decided to come up and visit for a few days I decided that it would be a good opportunity for me to make this month's challenge. She could keep an eye on JT for an hour, if needed, and we could have the torte as dessert. My poor sister ended up looking after JT most of the afternoon and was still waiting on her dessert at 9pm! It took much longer than expected and I didn't get it finished until dark which is why I have only one decent photo to show for all my efforts.

Aside from time issues I found it to be a success. I'm not a cake person - a big lump of sponge just doesn't do it for me - but I found the whole layered cake thing very pleasing. It meant each forkful contained a blend of both buttercream and sponge. It wasn't a difficult project I was just juggling it with dinner and time at the park. I divided the sponge mixture into 6 and just poured each sixth into an 8" sandwich tin (lined with greaseproof paper) to give each layer a nice uniform shape. I hope to give it a go again only this time I would make mini dobos tortes by making one large sheet of sponge and cutting out rounds using a cookie cutter. I wouldn't bother with the caramel topping - nobody ate it and it was too hard and stuck in our teeth. I'm just waiting on the right guinea pig!

DOBOS TORTE

Sponge cake layers
6 large eggs, separated, at room temperature
1 1/3 cups (162g) icing sugar, divided
1 teaspoon (5ml) vanilla extract
1 cup plus 2 tablespoons (112g) sifted cake flour (SUBSTITUTE 95g plain flour + 17g cornflour sifted together)
pinch of salt

Chocolate Buttercream
4 large eggs, at room temperature
200g caster sugar
110g bakers chocolate or your favourite dark chocolate, finely chopped
250g unsalted butter, at room temperature.

Caramel topping
1 cup (200g) caster (superfine or ultrafine white) sugar
12 tablespoons (180 ml) water
8 teaspoons (40 ml) lemon juice
1 tablespoon neutral oil (e.g. grapeseed, rice bran, sunflower)

Finishing touches
a 7” cardboard round
12 whole hazelnuts, peeled and toasted
½ cup (50g) peeled and finely chopped hazelnuts

Directions for the sponge layers:
NB. The sponge layers can be prepared in advance and stored interleaved with parchment and well-wrapped in the fridge overnight.

1.Position the racks in the top and centre thirds of the oven and heat to 400F (200C).

2.Cut six pieces of parchment paper to fit the baking sheets. Using the bottom of a 9" (23cm) springform tin as a template and a dark pencil or a pen, trace a circle on each of the papers, and turn them over (the circle should be visible from the other side, so that the graphite or ink doesn't touch the cake batter.)

3.Beat the egg yolks, 2/3 cup (81g) of the confectioner's (icing) sugar, and the vanilla in a medium bowl with a mixer on high speed until the mixture is thick, pale yellow and forms a thick ribbon when the beaters are lifted a few inches above the batter, about 3 minutes. (You can do this step with a balloon whisk if you don't have a mixer.)

4.In another bowl, using clean beaters, beat the egg whites until soft peaks form. Gradually beat in the remaining 2/3 cup (81g) of confectioner's (icing)sugar until the whites form stiff, shiny peaks. Using a large rubber spatula, stir about 1/4 of the beaten whites into the egg yolk mixture, then fold in the remainder, leaving a few wisps of white visible. Combine the flour and salt. Sift half the flour over the eggs, and fold in; repeat with the remaining flour.

5.Line one of the baking sheets with a circle-marked paper. Using a small offset spatula, spread about 3/4cup of the batter in an even layer, filling in the traced circle on one baking sheet. Bake on the top rack for 5 minutes, until the cake springs back when pressed gently in the centre and the edges are lightly browned. While this cake bakes, repeat the process on the other baking sheet, placing it on the centre rack. When the first cake is done, move the second cake to the top rack. Invert the first cake onto a flat surface and carefully peel off the paper. Slide the cake layer back onto the paper and let stand until cool. Rinse the baking sheet under cold running water to cool, and dry it before lining with another parchment. Continue with the remaining papers and batter to make a total of six layers. Completely cool the layers. Using an 8" springform pan bottom or plate as a template, trim each cake layer into a neat round. (A small serrated knife is best for this task.)

Directions for the chocolate buttercream:
NB. This can be prepared in advance and kept chilled until required.

1.Prepare a double-boiler: quarter-fill a large saucepan with water and bring it to a boil.

2.Meanwhile, whisk the eggs with the sugar until pale and thickened, about five minutes. You can use a balloon whisk or electric hand mixer for this.

3.Fit bowl over the boiling water in the saucepan (water should not touch bowl) and lower the heat to a brisk simmer. Cook the egg mixture, whisking constantly, for 2-3 minutes until you see it starting to thicken a bit. Whisk in the finely chopped chocolate and cook, stirring, for a further 2-3 minutes.

4.Scrape the chocolate mixture into a medium bowl and leave to cool to room temperature. It should be quite thick and sticky in consistency.

5.When cool, beat in the soft butter, a small piece (about 2 tablespoons/30g) at a time. An electric hand mixer is great here, but it is possible to beat the butter in with a spatula if it is soft enough. You should end up with a thick, velvety chocolate buttercream. Chill while you make the caramel topping.

Note: Make sure the butter is of a very soft texture i.e. running a knife through it will provide little resistance, before you try to beat it into the chocolate mixture. Also, if you beat the butter in while the chocolate mixture is hot you'll end up with more of a ganache than a buttercream!

Directions for the caramel topping:

1.Choose the best-looking cake layer for the caramel top. To make the caramel topping: Line a jellyroll pan with parchment paper and butter the paper. Place the reserved cake layer on the paper. Score the cake into 12 equal wedges. Lightly oil a thin, sharp knife and an offset metal spatula.

2.Stir the sugar, water and lemon juice in a small saucepan. Bring to a boil over a medium heat, stirring often to dissolve the sugar. Once dissolved into a smooth syrup, turn the heat up to high and boil without stirring, swirling the pan by the handle occasionally and washing down any sugar crystals on the sides of the pan with a wet brush until the syrup has turned into an amber-coloured caramel.

3.The top layer is perhaps the hardest part of the whole cake so make sure you have a oiled, hot offset spatula ready. I also find it helps if the cake layer hasn't just been taken out of the refrigerator. I made mine ahead of time and the cake layer was cold and the toffee set very, very quickly—too quickly for me to spread it. Immediately pour all of the hot caramel over the cake layer. You will have some leftover most probably but more is better than less and you can always make nice toffee pattern using the extra to decorate. Using the offset spatula, quickly spread the caramel evenly to the edge of the cake layer. Let cool until beginning to set, about 30 seconds. Using the tip of the hot oiled knife (keep re-oiling this with a pastry brush between cutting), cut through the scored marks to divide the caramel layer into 12 equal wedges. Cool another minute or so, then use the edge of the knife to completely cut and separate the wedges using one firm slice movement (rather than rocking back and forth which may produce toffee strands). Cool completely.

Assembling the Dobos

1.Divide the buttercream into six equal parts.

2.Place a dab of chocolate buttercream on the middle of a 7 1/2” cardboard round and top with one cake layer. Spread the layer with one part of the chocolate icing. Repeat with 4 more cake layers. Spread the remaining icing on the sides of the cake.

3.Optional: press the finely chopped hazelnuts onto the sides of the cake.

4.Propping a hazelnut under each wedge so that it sits at an angle, arrange the wedges on top of the cake in a spoke pattern. If you have any leftover buttercream, you can pipe rosettes under each hazelnut or a large rosette in the centre of the cake. Refrigerate the cake under a cake dome until the icing is set, about 2 hours. Let slices come to room temperature for the best possible flavour.
Blog Signature

Tuesday, 18 August 2009

Broccoli Slaw

Broccoli Slaw 16b

The first time I saw this recipe I knew I'd love it. In fact, since my two men don't eat broccoli, despite my best efforts, I made up a whole bowlful for myself. This is a great extra to bring to the table. It is delicious in sandwiches but most often I make a bowl of it for the table when I'm serving ham (and I have visitors). It keeps well for a few days and is very easily put together. I make it ahead of time and just keep it, covered in clingfilm, in the fridge until needed.

P1120143b

Broccoli Slaw
(Adapted from Smitten Kitchen)

1 head broccoli
50g flaked almonds*
50g dried cranberries*
1/2 small red onion, finely chopped
*You can add more or less of these according to taste

Dressing:
60ml buttermilk
80ml mayonnaise
1 tblsp cider vinegar
1 tblsp maple syrup

Trim broccoli, cut into chunks then finely chop. I use a food processor and I throw in most of the stem.

Toss the chopped broccoli, almonds, cranberries, and red onion together in a large bowl.

Whisk the dressing ingredients in a small bowl with a pinch of salt.

Stir the dressing through the broccoli mixture. That's it!

Broccoli Slaw 19b
Blog Signature

Tuesday, 11 August 2009

Think Pink!

Last week I promised my neice, Cousin Soph to JT, that she could come up a day to bake. Today, when I was out shopping, I noticed a jar of pink edible sprinkles and I immediately thought of Soph. Soph LOVES pink. Everything has to be pink. I threw them in the trolley and made a mental note to keep that promise a day soon. Later on when I was at home unpacking the groceries I lifted out the sprinkles and thought, "Why not now?" So I texted her mum and she arrived within the hour. We discussed the design brief, pink, and settled on watermelon lemonade and cupcakes with pink icing with pink sprinkles and she got to work with uncontained excitement.

Sophie Cupcakes Quad

And I mean she got to work. I am a firm believer in letting children have a go in the kitchen. So what if she weighs out a bit too little flour or a bit extra butter, what's the worst that can go wrong? I guarantee that no matter what's missing or what extras are in the mix it'll taste a million times better than anything else because she made them. I help and advise, of course. It's amazing the teaching opportunities that an hour of baking holds.

Sophies Cupcakes Duo

She weighed and beat and spooned and piped. You want to have seen the delight on that little girls face when I filled a piping bag up with pink icing and told her, "Here you do it yourself!" And she added the red food colouring to create the perfect shade of icing, which I think deserves the description 'shocking pink'.

Sophies Cupcakes (12)b

The watermelon lemonade was less exciting - just watermelon, sparkling water and a squeeze of lemon and sugar to taste but it was the fact that she was making a pink drink that pleased her.

No recipes today because everyone has a cupcake recipe somewhere and doesn't need another one.

Blog Signature

Saturday, 8 August 2009

Foodie Gifts

Choc-coated Honeycomb Box

Isn't this just so pretty? What do you think it might contain?

Chocolate-coated Honeycomb!

Choc-coated Honeycomb b

I love giving and I love receiving food gifts. They don't have to be home-made, I'm always delighted with a box of chocolate or a few buns lifted from the giver's local bakery. Home-made ones do have an edge, of course. But homemade or not I think it's the thought process that goes into food gifts that make them such a delight to receive.

Like the Raspberry and White Chocolate scones that my mum nearly always brings when she comes to visit because she knows I love them. Or the bag of coffee beans a friend brought a couple of months ago because she knows I'm fanatical about good coffee. Or the time my sister brought a pot of chilli because my baby had just been born and she knew that my OH isn't a great cook (sorry honey)! I could go on and on but you get the point, each of these gifts had a thought process behind them that conveyed the givers efforts to please.

I think my favourtie to date has been the box of macarons that my friend brought one Sunday we were having her and her husband for dinner. She knew I had been tackling macarons and that I was a bit obsessed with them. So she arrived with these:

Amandas Macarons

What a delight! And the box really finished it off. What a lovely way to present them. I'm always giving food away in tupperware boxes or tins and it kind of bugs me. They just don't do the food justice. And then there's the awkwardness of having to ask for your box back because you know if you don't you won't see them for months and it'll be forgotten about. So recently, I've made more effort in the presentation department. I went to my local bakery and they sold me a few plain white boxes which already look so much better. And then I started making boxes from some fancy papers I have in the house. As a Maths Teacher I've been making cube and cuboid nets for years but this is even less complicated than those. I literally cut out a square/rectangle (size determined by prospective contents) and score it 1" from each edge then fold the edges up and stick in place to form the base. Repeat with another piece of card to form the top and voila - a very pretty box. You can adorn it as you fancy (ribbon, diamante etc) or just leave it plain. Despite looking very fashionable and expensive it actually works out cheaper than buying a gift bag. Of course you don't need fancy papers you could just use two contrasting or complementary sheets of plain card (e.g. pink and brown). Or you could even just cover a box you have. And the next time you see some cheap tissue paper - buy it and throw a bit in your box before you put in the food.

Choc-coated Honeycomb c

Last night we were out at friends for tea. I knew that the host would go to a great deal of effort to make at least one (probably two) desserts and she wouldn't want to see me arriving with a third as there is only her and her husband to eat the leftovers (there's that thought process). So, I opted for chocolate-coated honeycomb that I knew they could nibble at over the next few days. And guess what? - I made a box to make it look special.

So go and glam up your foodie gifts!

P.S. Chocolate -coated Honeycomb is simply half the quantity of hokey-pokey dipped in 200g milk chocolate (use whatever chocolate you think the recipients will like).
Blog Signature