Tuesday 30 June 2009

Roasted Tomato and Basil Pasta


As you can see I am still coming up with ways to use the crop of basil I have in my back garden and well, the tomatoes just seem to creep in there everytime. This dish was soooo simple. The tomatoes just sit in the oven for hours until you're ready. I served cheese straws alongside (recipe to follow another day) but obviously you don't have to and any a nice crusty piece of bread will be just lovely.

Roasted Tomato and Basil Pasta
serves 2

1 punnet cherry plum tomatoes
pinch caster sugar
1 tblsp sea salt
1 tsp dried thyme
2 large bunches basil (a whole supermarket pot)
1 clove garlic, peeled
2 tblsp creme fraiche
2 tblsp grated parmesan (plus more for serving)
Olive oil (or garlic oil works well)
150g fusilli
Optional: 150-200g cooked chicken

1. Pre-heat oven to 100C

2. Cut the cherry tomatoes in half and place on a baking tray cut side up. Drizzle with 1 tblsp olive oil (I used garlic oil here but you don't have to) and scatter over the sea salt, dried thyme and sugar. Place in oven and leave for about 4 hours until they have wilted. Leave until needed on the baking tray with any juice.

3. Put half of the basil in a food processor with a lug of olive oil (again I used garlic oil), the garlic clove and the 2 tblsp parmesan. Process to a paste and set aside.

4. About 20 mins before serving put your pasta on to boil. Pick the leaves from the rest of your basil.

5. Put your basil paste in a frying pan over a low heat. Add the chicken, if using, and the creme fraiche. Stir to combine and check seasoning. Add a splash of the pasta's cooking water and then drain the pasta. Toss the pasta in the sauce then stir through the remaing basil leaves.

6. Serve with freshly grated parmesan.
Blog Signature

Monday 29 June 2009

Cherry Tomato and Basil Roast Chicken

Because (a) almost every Sunday I cook roast chicken for lunch and (b) we have a bumper crop of basil in the garden. I decided to make this.

It's from 'Jamie's Dinners' (with one or two 'tweaks'). I'm not a huge Jamie fan (despite having 4 of his cookbooks), as I've found quite a few of his dishes disappointing. However, this turned out to be a wonderful summery, dish.

Apart from tasting great, it has the added bonuses of being made in one pan (less washing up) and you don't need to make any gravy when it's ready - the tomatoes sort of 'melt' into juice and take care of that.

I would have loved to have made this with some home-grown tomatoes but until we find someone willing to donate us a greenhouse we'll have to make do with good-quality store-bought ones. If you do have a crop of shiny little red marbles in your greenhouse then I urge you to make this, that is, of course, if you haven't already eaten them!


Cherry Tomato and Basil Roast Chicken
(aka Crispy Everyday Chicken)

1 whole chicken (1.5-2kg) jointed into 10 pieces
sea salt and freshly ground black pepper
a big bunch of fresh basil, leaves picked, stalks finely chopped
2 packets of cherry (preferably plum) tomatoes (about 500g), halved,
1 whole bulb of garlic, broken up into cloves
1 fresh red chilli, finely chopped
olive oil
500-750g new potatoes (depending on how many you are serving)

Preheat your oven to 180°C/350°F/gas 4.

Put your chicken pieces into a snug-fitting pan in one layer. Throw in all the basil leaves and stalks, then chuck in your tomatoes and potatoes. Scatter the garlic cloves into the pan with the chopped chilli and drizzle over some olive oil. Season with salt and pepper. Mix around a bit, pushing the potatoes underneath. Place in the oven for 1½ hours, until the chicken skin is crisp and the meat falls off the bone.
Blog Signature

Saturday 27 June 2009

Chicken, Arrowroot and Gingerbread Muffins

Q: What do you get when you combine, chicken, arrowroot and gingerbread muffins?
A: A very eventful Saturday!

I wasn’t meant to blog again today – My Daring Bakers took care of that (and besides I have way too much housework to do). But some of today's events were too good to forget!

First of all this lady arrived....

with this little guy....

and this one.....


In fact, we are now the proud owners of a mother hen and eight little chicks! (Names anyone?)


Then, while I was playing the domestic goddess and baking gingerbread muffins this little guy did this!!!!!!!!!!
Boy did he enjoy himself.
What's the matter mummy?
I just concentrated on my baking for 3 SECS and that's what happened!

Well, at least I had gingerbread muffins to console me.

Gingerbread Muffins

250g plain flour
½ teaspoon bicarb of soda
1 teaspoon baking powder1
½ teaspoons ground ginger
1 teaspoon ground cinnamon
¼ teaspoon ground cloves
1 egg
50g dark muscovado sugar
50g light muscovado sugar
150ml full-fat milk
¼ teaspoon balsamic vinegar
6 tablespoons vegetable or corn oil
4 tablespoons golden syrup
4 tablespoons black treacle.

Preheat oven to 200c.

Line a 12 hole muffin tin with muffin papers.Combine the flour, bicarb, baking powder & spices in a large bowl. Whisk the egg in a large measuring jug then add the sugars, breaking up any large lumps. Add the milk and vinegar then measure in the oil with a tablespoon. Use the same oily spoon to add the syrup & treacle so they don’t stick to it. Whisk the mixture to combine and add to the flour mix. Stir until mixed but still fairly lumpy. Spoon into muffin papers & bake for about 20 minutes until the tops are dry.
(I made half the mixture to produce 6 muffins)
Blog Signature

June Daring Bakers - Bakewell Tart

The June Daring Bakers' challenge was hosted by Jasmine of Confessions of a Cardamom Addict and Annemarie of Ambrosia and Nectar. They chose a Traditional (UK) Bakewell Tart... er... pudding that was inspired by a rich baking history dating back to the 1800's in England.


If I was superstitious I would say I am not meant to be a Daring Baker. Last month's recipe wasn't a great success for me so I embraced this month's recipe (I love almonds) and put quite a lot of time into considering how I would put my own little twist on these.

In fact, one evening I went for a long walk on my own. Later in bed that night OH asked me, "Why did you go for a walk this evening?" "I needed some time to think," was my reply. He rolled over concerned and asked me, "What about?" "What I'm going to put into my Daring Bakers Challenge this month!" He groaned, rolled back and went to sleep.

I finally decided that I would make little tartlets. I couldn't choose between Raspberry Rose Jam (which I would make using rosewater) and a rich chocolate ganache, using a 100% cacao stick I had been saving, so I decided I would make both. But despite my best efforts, my local supermarkets and delis just would not cough up rosewater. So I ordered some rose syrup online. However, after waiting two weeks for it to arrive I gave up and went ahead and made plain raspberry jam (it did, of course, arrive that very afternoon)!

Then to top it all off, the morning I was in the middle of making my tartlets, my mum phoned to say my granny had died. I was in the middle of making them so I finished them off but all intentions of variations went out the window. And sadly to say, Bakewell Tarts will now always bear the association with my Granny's death.

Bakewell Tart…er…pudding

Makes one 23cm (9” tart)
Prep time: less than 10 minutes (plus time for the individual elements)
Resting time: 15 minutes
Baking time: 30 minutes
Equipment needed: 23cm (9”) tart pan or pie tin (preferably with ridged edges), rolling pin

One quantity sweet shortcrust pastry (recipe follows)
Bench flour 250ml (1cup (8 US fl. oz))
Jam or curd, warmed for spreadability (I made my own Raspberry Jam)
One quantity frangipane (recipe follows)
One handful blanched, flaked almonds

Sweet Shortcrust Pastry

Prep time: 15-20 minutes
Resting time: 30 minutes (minimum)
Equipment needed: bowls, box grater, cling film

225g (8oz) all purpose flour
30g (1oz) sugar
2.5ml (½ tsp) salt
110g (4oz) unsalted butter, cold (frozen is better)
2 egg yolks
2.5ml (½ tsp) almond extract (optional - I used it but would leave it out next time as the taste was too strong for me along with the extract in the frangipane)
15-30ml (1-2 Tbsp) cold water

Sift together flour, sugar and salt. Grate butter into the flour mixture, using the large hole-side of a box grater. Using your finger tips only, and working very quickly, rub the fat into the flour until the mixture resembles bread crumbs. Set aside.

Lightly beat the egg yolks with the almond extract (if using) and quickly mix into the flour mixture. Keep mixing while dribbling in the water, only adding enough to form a cohesive and slightly sticky dough.

Form the dough into a disc, wrap in cling and refrigerate for at least 30 minutes

Frangipane

Prep time: 10-15 minutes
Equipment needed: bowls, hand mixer, rubber spatula

125g (4.5oz) unsalted butter, softened
125g (4.5oz) icing sugar
3 eggs
2.5ml (½ tsp)
almond extract
125g (4.5oz) ground almonds
30g (1oz) all purpose flour

Cream butter and sugar together for about a minute or until the mixture is primrose in colour and very fluffy. Scrape down the side of the bowl and add the eggs, one at a time, beating well after each addition. The batter may appear to curdle. In the words of Douglas Adams: Don’t panic. Really. It’ll be fine. After all three are in, pour in the almond extract and mix for about another 30 seconds and scrape down the sides again. With the beaters on, spoon in the ground nuts and the flour. Mix well. The mixture will be soft, keep its slightly curdled look (mostly from the almonds) and retain its pallid yellow colour.

Assembling the tart

Place the chilled dough disc on a lightly floured surface. If it's overly cold, you will need to let it become acclimatised for about 15 minutes before you roll it out. Flour the rolling pin and roll the pastry to 5mm (1/4”) thickness, by rolling in one direction only (start from the centre and roll away from you), and turning the disc a quarter turn after each roll. When the pastry is to the desired size and thickness, transfer it to the tart pan, press in and trim the excess dough. Patch any holes, fissures or tears with trimmed bits. Chill in the freezer for 15 minutes.

Preheat oven to 200C/400F.

Remove shell from freezer, spread as even a layer as you can of jam onto the pastry base. Top with frangipane, spreading to cover the entire surface of the tart. Smooth the top and pop into the oven for 30 minutes. Five minutes before the tart is done, the top will be poofy and brownish. Remove from oven and strew flaked almonds on top and return to the heat for the last five minutes of baking.

The finished tart will have a golden crust and the frangipane will be tanned, poofy and a bit spongy-looking. Remove from the oven and cool on the counter.

Serve warm, with crème fraîche, whipped cream or custard sauce if you wish.When you slice into the tart, the almond paste will be firm, but slightly squidgy and the crust should be crisp but not tough.


Blog Signature

Saturday 20 June 2009

Seared Salmon and Singapore Noodles


The Nigella Cookalong has been resurrected and this was the first challenge chosen by 'ManicMummy'. When I bought Nigella Express at Easter I had earmarked this recipe to try sometime but the truth was I didn't think it would go down too well with my two men so I wan't sure how I was going to get round to it. So I was delighted to have to make it for the Cookalong.

True to form though, my two men surprised me and thoroughly enjoyed this meal so I'll be making it again in the future. Both recipes could be made independent of each other. The noodles don't even need anything to accompany them but are a quick, comforting dish on their own. Using madras curry powder to form coating on the salmon is delicious and is great when you want something hot but low effort and quick. It's also a great way of jazzing up a less flavourful piece of salmon.

I made my own curry powder for this recipe (gasp!) but only because I couldn't get Madras curry powder and I had all the ingredients to make it in my spice drawer. It really wasn't much hassle (although I don't reccommend doing it if you can get your hands on Madras curry powder) and now I have quite a potful so I won't be doing that for some time again. I was liberal with the cayenne since I like to be but you can be as restrained as you like.

SEARED SALMON WITH SINGAPORE NOODLES

INGREDIENTS

2 teaspoons medium Madras curry powder
1/4 teaspoon table salt
1 teaspoon sugar
4 salmon fillets, approx. 200g each
1 x 15ml tablespoon garlic oil

FOR THE NOODLES:
250g vermicelli rice noodles
50g dried shrimp (I couldn't get these so I used small cooked prawns and chopped them up)
125ml Chinese cooking wine
1 x 15ml tablespoon garlic oil
100g finely sliced Chinese leaf
125g baby corn, sliced into thin rounds
2 spring onions, finely sliced
2 teaspoons medium Madras curry powder
1 teaspoon finely chopped ginger
250ml chicken stock (from concentrate)
3 x 15ml tablespoons soy sauce
150g beansprouts
4 x 15ml tablespoons chopped fresh coriander

METHOD

1.Mix the curry powder, salt and sugar in a wide, shallow dish and dredge the salmon in this, turning the pieces all over in the rub.

2.Heat the oil in a heavy-based pan and cook the salmon fillets on a high heat for about 2–3 minutes a side, searing the sides of the fillets too if they are very thick.

3.Put the rice noodles into a bowl and cover with boiling water. Leave them to soak for 4 minutes and then drain them.

4.Soak the dried shrimp in the wine, then heat the oil in a wok and fry the Chinese leaf, baby corn and spring onions for a few minutes.

5.Add the curry powder and finely chopped ginger to the wok, and then the chicken stock and soy sauce. Pour in the shrimps, with their wine, and the drained, soaked noodles, tossing and shaking everything all together in the wok.

6.Finally, stir in the beansprouts and give a final toss, before turning out into a bowl and sprinkling with the coriander.

Madras Curry Powder

Ingredients (1/2 pound)

8 tablespoons coriander seeds
6 tablespoons cumin seeds
1 tablespoon mustard seeds
1 tablespoon fennel seed
4 tablespoons ground cinnamon
8 tablespoons peppercorns
1 tablespoon ground nutmeg
1 tablespoon whole cloves
2 tablespoons ground cardamon
2 tablespoons turmeric
2 tablespoons ground ginger
1 tablespoon cayenne (or less if less heat is desired)

Method:

1. In a dry skillet over very low heat, place the coriander, cumin, mustard and fennel seeds. Roast the seeds gently, shaking the pan occasionally, until they begin to pop. When about half the seeds have popped, add the cinnamon, peppercorns, nutmeg, cloves, cardamom, turmeric, ginger and cayenne.

2. Continue to heat and stir gently until the mixture is quite hot but not burnt. Pour into a dry blender or food processor, or use a mortar and pestle. Grind into a fine powder. Pour into a clean, dry jar, seal, and let it cool before using


Blog Signature

Wednesday 17 June 2009

Dough


My surprise finally arrived today. And how delighted I am. Hubby was clever enough to go to my Amazon wishlist and this was right at the top of it. (How I love my Amazon Wishlist - it means someone can buy me something and be spot on everytime!).

Just two problems:
(a) I don't have time to bake bread right now;
(b) I don't have time to read it right now.

Things are busy at the moment (mainly because of two certain people's birthdays this month)!

So I'm trying to save it till I can curl up and indulge in it for at least an hour.

I'm guessing it'll make it till tomorrow.

A very special thank-you to my two favourite men.
xoxoxoxoxo


Blog Signature

Friday 12 June 2009

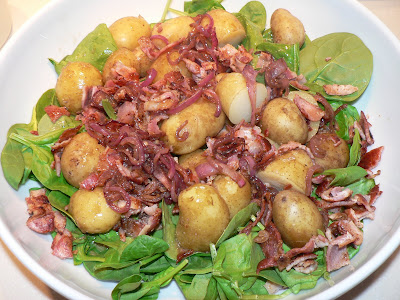
Hot Potato, Bacon and Spinach Salad

This is the dinner I was trying to make last night while Jacob was occupying himself with the pegs. Maybe that's why it turned out so good. But I'll definately be making this again and again and again.

When those beautiful little Jersey Royal gems show themselves in the shops at the start of the summer I immediately think salad! Now if I'm going to make salad for dinner and I want my two men to it then it has to be substantial, it has to contain meat and it has to be warm (unless it's a real scorcher of a day). This salad has the added bonus of being incredibly easy to make. The bacon and onions can be fried and chopped ahead of time, the potatoes can sit in a pan of cold water ready to be turned on half an hour before you want to serve (using just one hand, if like me you're carrying a baby around) and the spinach just involves opening a bag (if you buy the ready washed version). The dressing comes from Pioneer Woman .

Hot Potato, Bacon and Spinach Salad

Ingredients:

100g Fresh Spinach

350g Jersey Royal Potatoes, washed (or other salad potatoes)
1 small red onion
1 packet of bacon (about 6 rashers)
3 tablespoons red wine vinegar
2 teaspoons sugar
1/2 teaspoon Dijon mustard
Olive oil to taste

Method:

1. Put your potatoes on to boil.

2. Fry the bacon with a little butter or oil. DO NOT THROW AWAY THE GREASE. Strain the grease into a container for later (you can leave a little in the pan for frying the onion). Set aside to cool down and when cool, chop up.

3. Peel, half and then slice the onion and fry in the same pan. Set aside with the chopped bacon.

4. Make the dressing: Put the vinegar, sugar, mustard and grease into a small pan (I use a metal measuring cup). Whisk together while heating gently. Taste to see if you need some oil (this will depend on how much grease came out of your bacon). Season accordingly. Set aside until the potatoes are ready.

5. When your potatoes are ready, drain them and assemble the salad: Put the spinach in a large shallow bowl, topple the potatoes over the top, followed by the bacon and then the onions. Finally pour over the dressing (re-heated if necessary).
Blog Signature

Tuesday 9 June 2009

Perfect All Butter Pastry


Today is a notable day in my culinary achievements. I have finally mastered all-butter pastry. I have tried so many techniques over the years and never been totally satisfied. Sometimes I would blind bake the pastry, sometimes I would use a mixer, sometimes I would add an egg.... you get the picture. But I have finally settled on the necessary ingredients and techniques to make the perfect all-butter savoury pastry. And here it is:


All-Butter Pastry (for a savoury filling)
Ingredients (for a 23cm tart tin)
260g plain flour
115g butter fridge cold
pinch of salt
1 large egg
Technique
1. Weigh the flour and salt into a bowl.
2. Grate the butter into the flour (using the large holes in the grater).
3. Rub the butter into the flour with your fingertips until it resembles fine breadcrumbs.
4. Add the egg to the mixture and work together with a knife - add some iced water as required to bring it together.
5. As soon as the pastry comes together (do not overwork it), press it into a 2cm thick disc, wrap in cling film and leave to rest in the fridge for 30 mins.
6. Lightly flour the table and roll out the pastry until 3mm thick.
7. Roll the pastry over the tin, tuck it into place and gently press against the 'corner' of the base to ensure a complete fit. Leave some pastry hanging over the edge. Prick the base of the pastry all over, then chill in the fridge for another 30mins.
8. Remove the pastry case from the fridge. Line the base of the pastry with baking parchment and fill with baking beans. Place on a baking tray and blind bake for 20mins.
9. Remove the beans and parchment from the pastry case and return to the oven for another 5mins to cook the base.
10. Brush the pastry base with egg white to seal the holes. Trim the pastry around the edges and leave to cool or fill with your desired filling. (Today mine was asparagus and goat's cheese).


Now to master the sweet one!

Blog Signature